Telegram Mini Apps API Cheatsheet
A quick reference for the Telegram Mini Apps (Web Apps) API: theme variables, server-side initData validation, BackButton / MainButton, popups and the QR scanner.

To start using the Telegram Mini Apps (Web Apps) API, add the following script to your HTML:
<script src="https://telegram.org/js/telegram-web-app.js"></script>This injects the window.Telegram object and a set of CSS custom properties that match the user's current Telegram theme.
Most of your interaction happens through window.Telegram.WebApp, which exposes a rich set of methods and properties.
Theme & CSS Variables
The API automatically provides CSS variables so your Mini App can seamlessly match the user's Telegram theme (light/dark or custom). You don't need to do anything extra — just use them:
var(--tg-theme-bg-color)
var(--tg-theme-text-color)
var(--tg-theme-hint-color)
var(--tg-theme-link-color)
var(--tg-theme-button-color)
var(--tg-theme-button-text-color)
var(--tg-theme-secondary-bg-color)
You can also access the same values in JavaScript:
const {
  bg_color,
  text_color,
  hint_color,
  button_color,
  button_text_color,
  secondary_bg_color,
} = Telegram.WebApp.themeParams
User Authentication
Always validate that the user is coming from a real Telegram client. Never trust client-side data without server-side verification.
1. Read the raw initData string
const initData = Telegram.WebApp.initDataIt is a query string containing (among others):
| Field | Meaning |
|---|---|
auth_date | Unix timestamp when the form was opened |
hash | HMAC signature used for validation |
query_id | Optional session identifier needed for answerWebAppQuery |
user | JSON object with id, first_name, last_name, username, language_code, … |
Example:
query_id=...&user=%7B%22id%22%3A...%7D&auth_date=...&hash=...2. Validate initData on your backend
Send the entire initData string to your server. Official validation algorithm:
data_check_string = ...   // all fields except hash, sorted alphabetically, joined by \n
secret_key = HMAC_SHA256(bot_token, "WebAppData")
if (hex(HMAC_SHA256(data_check_string, secret_key)) === hash) {
  // Data is authentic
}
Node.js example:
const crypto = require('crypto')

function verifyTelegramWebAppData(telegramInitData, botToken) {
  const encoded = decodeURIComponent(telegramInitData)
  const arr = encoded.split('&')
  const hashIndex = arr.findIndex((str) => str.startsWith('hash='))
  const hash = arr.splice(hashIndex, 1)[0].split('=')[1]

  arr.sort((a, b) => a.localeCompare(b))
  const dataCheckString = arr.join('\n')

  const secret = crypto
    .createHmac('sha256', 'WebAppData')
    .update(botToken)
    .digest()

  const calculatedHash = crypto
    .createHmac('sha256', secret)
    .update(dataCheckString)
    .digest('hex')

  return calculatedHash === hash
}
Also check that auth_date is recent (e.g. within the last few minutes) to prevent replay attacks. Once validated, you can safely trust the data on your server.
Getting User Data (Frontend)
After successful backend validation you can parse the data on the client if needed:
const params = new URLSearchParams(Telegram.WebApp.initData)
const userData = Object.fromEntries(params)

if (userData.user) {
  userData.user = JSON.parse(userData.user)
}

// userData is now ready to usePrefer using the validated data returned from your backend rather than relying solely on the client-side parse.
Back Button
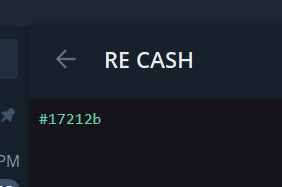
const tg = Telegram.WebApp

// Show the back button
tg.BackButton.show()

// Check visibility
console.log(tg.BackButton.isVisible)

// Handle click
const goBack = () => {
  // your navigation logic
}
tg.BackButton.onClick(goBack)

// Remove the handler
tg.BackButton.offClick(goBack)

// Hide the button
tg.BackButton.hide()
Main Button

const btn = Telegram.WebApp.MainButton

// Properties (you can read or write most of them)
btn.text // string
btn.color // hex color
btn.textColor // hex color
btn.isVisible // boolean
btn.isActive // boolean
btn.isProgressVisible // boolean (read-only)

// Events
btn.onClick(callback)
btn.offClick(callback)

// Methods
btn.setText('Buy Now')
btn.show()
btn.hide()
btn.enable() // default state
btn.disable() // button becomes non-clickable
btn.showProgress(true) // show spinner (pass false to keep button enabled while loading)
btn.hideProgress()
Closing Confirmation

When enabled, Telegram will ask the user for confirmation before closing the Mini App:
const tg = Telegram.WebApp

tg.enableClosingConfirmation()
tg.disableClosingConfirmation()
Opening Links
Telegram.WebApp.openLink('https://youtube.com')
// Optional second parameter: { try_instant_view: true }
Popups
Custom Popup
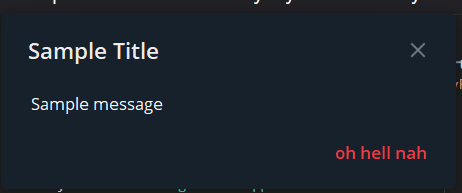
Telegram.WebApp.showPopup(
  {
    title: 'Sample Title', // optional
    message: 'Sample message',
    buttons: [
      { id: 'ok', type: 'default', text: 'OK' },
      { id: 'cancel', type: 'destructive', text: 'Cancel' },
    ],
  },
  (buttonId) => {
    console.log('Pressed button:', buttonId)
  },
)
See the official docs for all button types.
Alert

Telegram.WebApp.showAlert('Sample alert', () => {
  // called after the user dismisses the alert
})
Confirm

Telegram.WebApp.showConfirm('Are you sure?', (confirmed) => {
  // confirmed === true if the user pressed OK
})
QR Code Scanner
Telegram.WebApp.showScanQrPopup(
  { text: 'Point your camera at a QR code' },
  (scannedText) => {
    console.log('Scanned:', scannedText)
    return true // return true to close the scanner
  },
)

// Later you can close it manually
Telegram.WebApp.closeScanQrPopup()
Ready & Expand
Tell Telegram the Mini App is ready to be shown:
Telegram.WebApp.ready()Expand to full height (useful on mobile):
console.log(Telegram.WebApp.isExpanded) // current state
Telegram.WebApp.expand()